

I dove headfirst into the furry fandom* in early 2022. This might come as a surprise to some of the people reading this blog— most of the people who know me under this identity have no knowledge of this. I’ve been intentionally keeping it separate from this persona until now.
* I expect that if you’re reading this blog, you are at least vaguely aware of what the furry fandom is. If you aren’t, click here for a good introduction by a sociologist who studies the community.
This blog is a tech-oriented one. Some of my peers make their connections to the fandom inseparable from their content; I prefer posting about bizarre engineering. True to form, this article is about my experiences building a customized robotic tail for myself.
What’s going on here?
This video showcases the end result of the project as of November 2023. Some background is needed to explain it.
Obviously, the tail is moving. If you haven’t spent much time around the furry fandom, that’s unusual. Most members of this community wear what are effectively custom-designed pillows with belt loops. They end up having the effect of bouncing around on a belt as the wearer walks.

Although I originally bought one of these, it never quite felt right. If I was wearing an extra limb, shouldn’t it feel like an extra limb and not a limp pillow?
Well, as it turns out, there’s a U.K. company that might be able to help.
The Tail Company are a general cosplay company that make animatronic ears, tails and wings all custom made to order. Give them your desired design and they’ll take their in-house designed robotics, create your design on top of it, and ship it to you, all for an astonishingly reasonable price. While they don’t target the furry fandom specifically, they certainly do get a number of orders from that subculture.
I’ve heard of some wild things being done with this equipment. Someone put four of them together to make a Doc Oc cosplay. You can see it on Instagram here.
The “MiTail”, as it’s called, comes with a rather flexible app that declares how the tail should move. There’s a lot of functionality to this app— the tail has twelve built-in movement patterns, which you can trigger on demand by pressing a button. You can set it to begin patterns either automatically or in response to walking (your phones accelerometer is used to determine this).
While this was very cool, it still didn’t fit my needs. My extra limb should feel like an extra limb that I have direct control over. Having it wander around with a mind of its own felt worse than it not moving at all.
I absentmindedly discussed this with a friend, and wondered aloud if I could write code to control it with a game controller instead. Two months later, on my birthday, a large tube showed up from the U.K. on my doorstep. A project had been dropped into my lap… Or my spine, as it were.
Unboxing
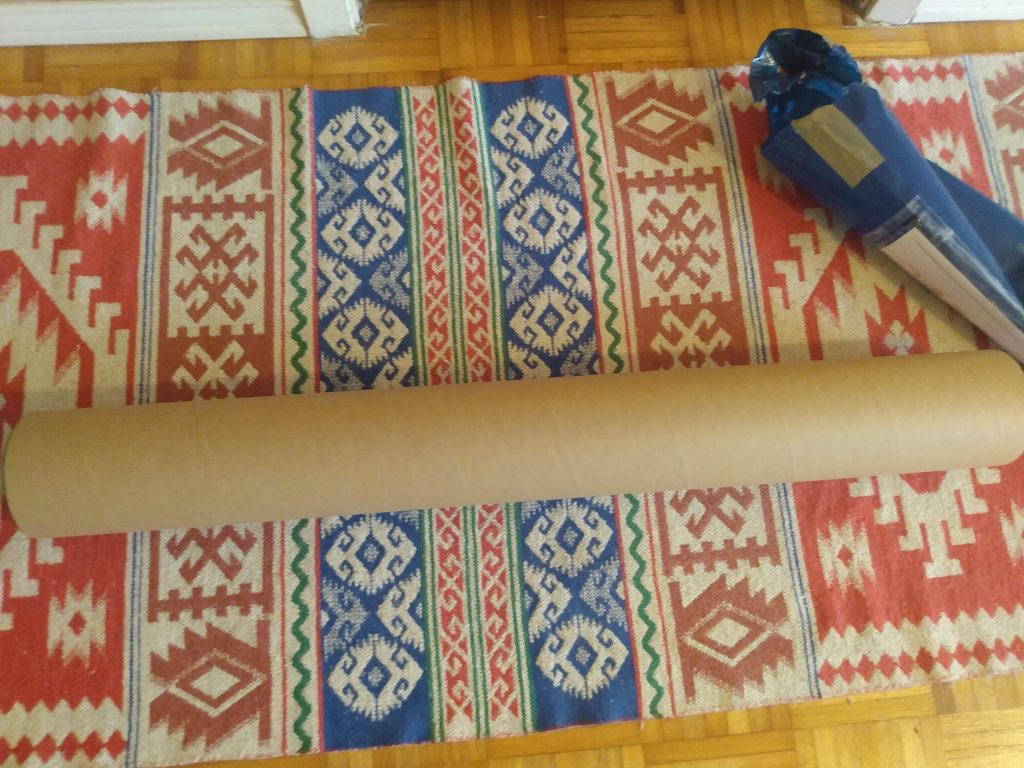
I live-unboxed the app to the purchase of the tail and my reaction to it, so I have some illuminating reactions from the time period. It comes in a large cylinder that looks like this—
Unboxing it looks like this—
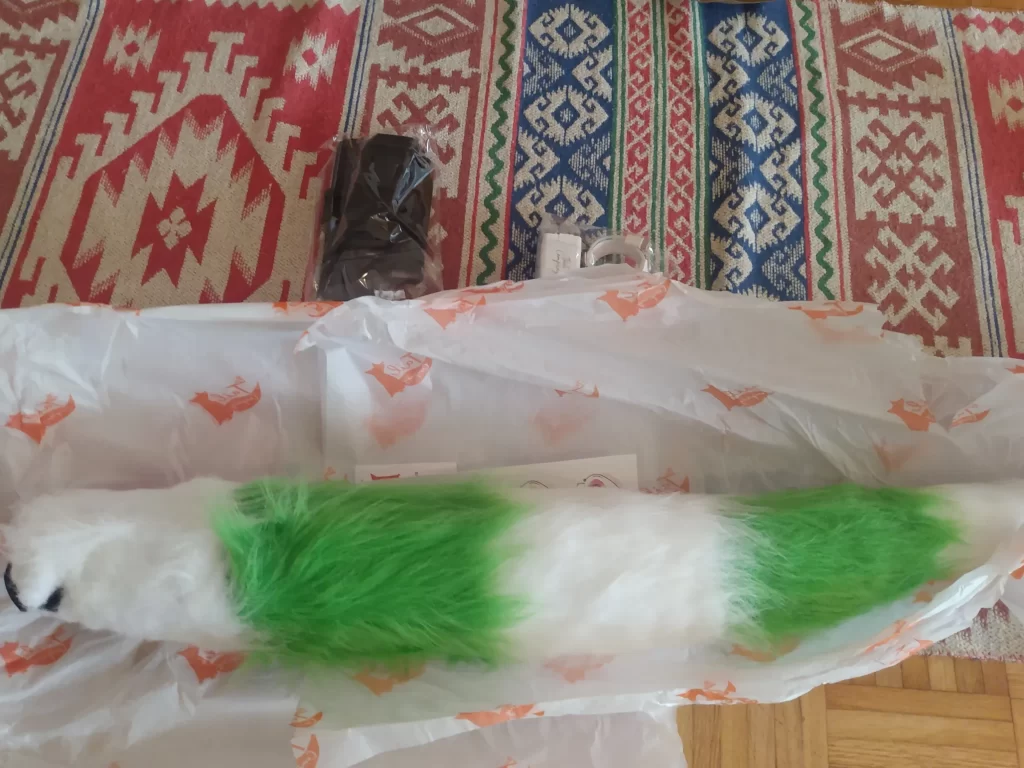
Custom branded power supply, belt and belt attachment, and the magic device itself wrapped up in some nice paper. We’re off to a good start. I plugged it in while starting to look up the app…
nocoffei 08/24/2022 6:45 PM
holy cow. The app is open source. https://github.com/MasterTailer/CRUMPET
Well, we’re off to a good start…
MayimumBean 08/24/2022 6:45 PM
Sweet. Glad to hear there promises about custom use on their website were based.
nocoffei 08/24/2022 6:45 PM
wait
You know I’ve literally never looked into this right?
Like, this was a pipe dream. I’ve never even looked at their website.
You’re saying that my idea to make this thing custom controlled is an explicit design choice?
I assumed that it was going to be a reverse engineering task for the ages
The app seems to have a Linux version holy cow
literally my shitpost from yesterday coming to life
Sure enough, we really are off to a good start. There’s a Telegram chat for the company, and the tail command protocol is documented. There’s a very interesting USERMOVE command that lets you effectively take direct command of the tail— you can define some movement with what appear to be called “servos” and then activate that move…
After a couple more days I had successfully created three USERMOVEs by sending it through the Bluetooth Serial Console. One pulled the tail all the way to the left, one all the way to the right, and one straight up. Now it was on to wiring up a controller to this…
Version 1
This turned out to be very easy thanks to the rather recent QtGamepad library. It exposes HID devices in a rather generic way. Because the original app, Crumpet, was written in Qt, I just had to pair my Joy-Con to my laptop, install the plugin, and I was off to the races.
But the pairing part turned out to be a rather significant problem much later on…
So, I now had access to my Joy-Cons input buttons and joystick. After learning some QML and finding the place in the source code where tail moves are executed, I was able to add some glue code that checked if the X axis changed, and if so, activate the USERMOVE that corresponded.
There was a serious problem with this, however. USERMOVEs, as written, always “homed” the tail after it was completed— releasing the servos to their relaxed position, where they cannot be damaged. This is good for safety purposes, but fatal to my plans, as any input I make would always slowly release back to home before the next one can be submitted.
The developer of the firmware acknowledged this constraint and was interested in my project. He went extremely far out of his way to add a “no-home” feature— writing an “H0” at the end of a USERMOVE will prevent it from homing when completed. He attached a warning to this ability— caution should be exercised when the tail is left in this state, as the servos are left extended and the gears inside them could be ground up if they were forcibly moved (i.e. if you bumped into something). It’s best to home the tail whenever it isn’t moving in order to prevent potential damage.
With this addition in place, I was able to complete my first version of the controller-based tail code. The modified app speaks through my laptop to the tail. It can be moved to the left and right with the joystick, straight up with the trigger, and home with the side buttons.
Initial results were very positive. I got positive feedback from my peers who had never seen anything like it, and some of them had been in the fandom for over a decade. But I quickly noticed that, with the Joy-Con in my hands, it was far too easy to accidentally input a new direction. This wasn’t just inconvenient— it was dangerous. If the tail is activated in the no-home state and I don’t expect it to be, I might damage it by bumping into something. I can’t actually feel it move, so I’d better be confident my control system puts it where I think it is! (This is a recurring problem with this project.)
I added a “guard button”— actions are only taken when the left trigger is pressed. After moving around the control scheme to support this, I got a finalized V1 which was up to my satisfaction.
Interlude
I set the project aside for a few months after finishing V1 in October, but wanted greater expression with the second revision in time for a convention in March. So in January I started poking it with a stick once again.
First, I sent out a bug report with the initial no-home tail firmware. Movement was spurious in a way that wasn’t apparent with the three-move structure but would become clear if the movement was expanded upon any further.
The bug was squashed within four days.
At this point my interactions with these people had been so overwhelmingly positive that they had cemented themselves in my mind as the best commercial company I’ve ever worked with. At every point the people behind the scenes had been open, earnest, interested in my work, and just overall fantastic to talk to. And they directly supported my project with new features and bug fixes.
They didn’t have to do any of this. I expected when I started out that coercing the hardware to do what I wanted would be a reverse engineering task. Instead, they went out of their way time and time again to support my arcane use case.
Version 2
What does it mean to take input from a joystick? What does it mean to move the tail? And how can I map these two constructs together? Answering these questions would be key to achieving the V2 goal of full prehensile movement, beyond the basic three-move structure V1 had.
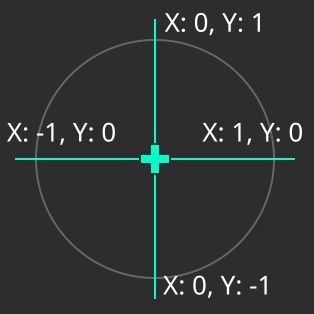
A joystick is pretty simple to understand. It’s a circular device that outputs an X coordinate and a Y coordinate. Both are output from -1 to 1.
The tail is a bit harder to understand. Every tail on the inside is the same; it’s the faux fur “sock” covering the electronics that makes each one unique. It’s composed of two servos, each of which drive a thin wire along the skeleton. When one servo retracts, it pulls the skeleton in one direction. When the other servo retracts, it pulls the wire in the other direction. When both servos retract, they cancel out each others motion and pull straight up.
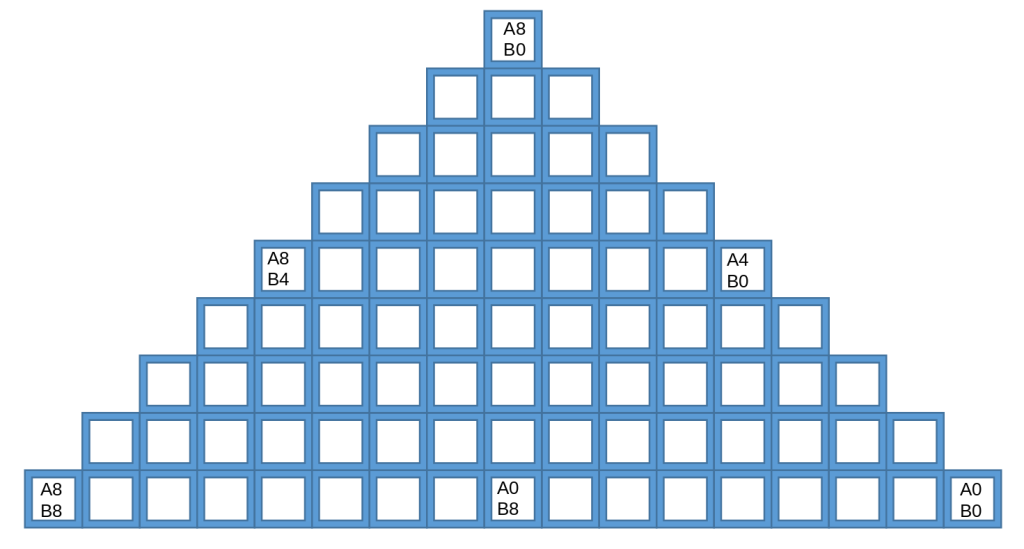
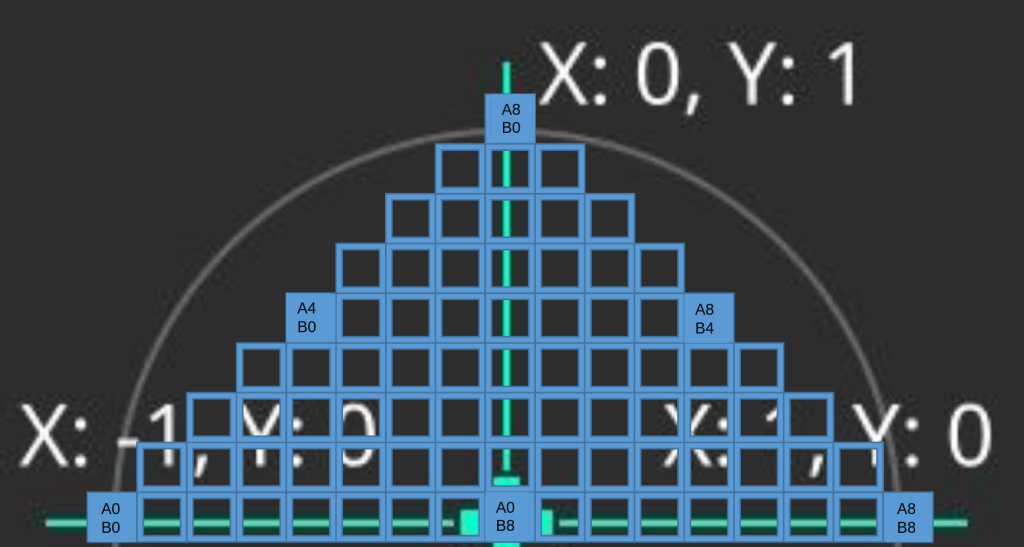
This is easy to read, but difficult to comprehend, and harder when reading the documentation for the commands to be sent. Each servo has 9 possible positions, each corresponding to 12.5 degree motion increments from 0 to 100 degrees. The A servo, as it’s called, can be sent values from 0 to 8. The B servo, on the other hand, has values from 8 to 0.
The end result of this is that you get a triangle of movement possibilities, like so:
If you really want to wrap your head around this, the best way to do it is to see it in action!

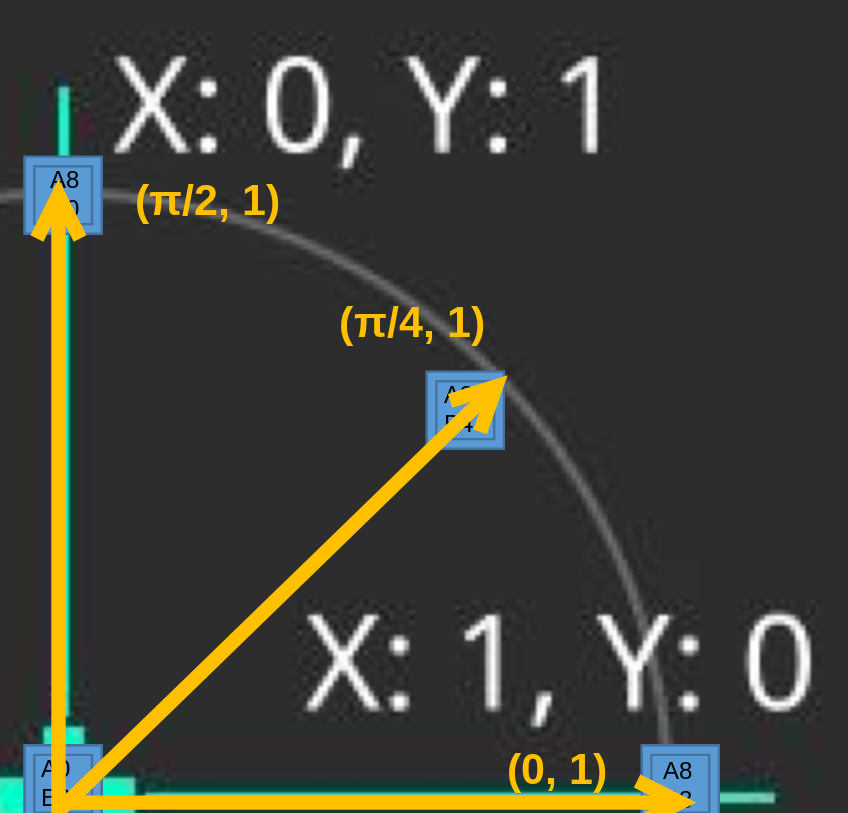
Now, what we want is the ability to map the controller inputs like so:
But how, exactly, to accomplish this? It took weeks of bouncing around thoughts in my head and talking to others. But once a mathematician friend said the word “vector”, it all clicked, and I came up with a neat algorithm to make this happen.
Mathematicians may have recognized that the joystick input space is a classic unit circle. Thinking way back to our high school trigonometry classes, the unit circle is a circle around which the magnitude of all vectors is equal to 1.
A vector is composed of direction and magnitude. Instead of thinking about our joystick input in Cartestian (X-Y) space, we can instead think about in Polar (vector-based) space. Our inputs now have a direction from 0 to π/2, and a magnitude from 0 to 1.
With this view, the answer becomes a bit clearer. Let’s now remap the bounds from [0..π/2] to [0..8] and [0..1] to [8..0].
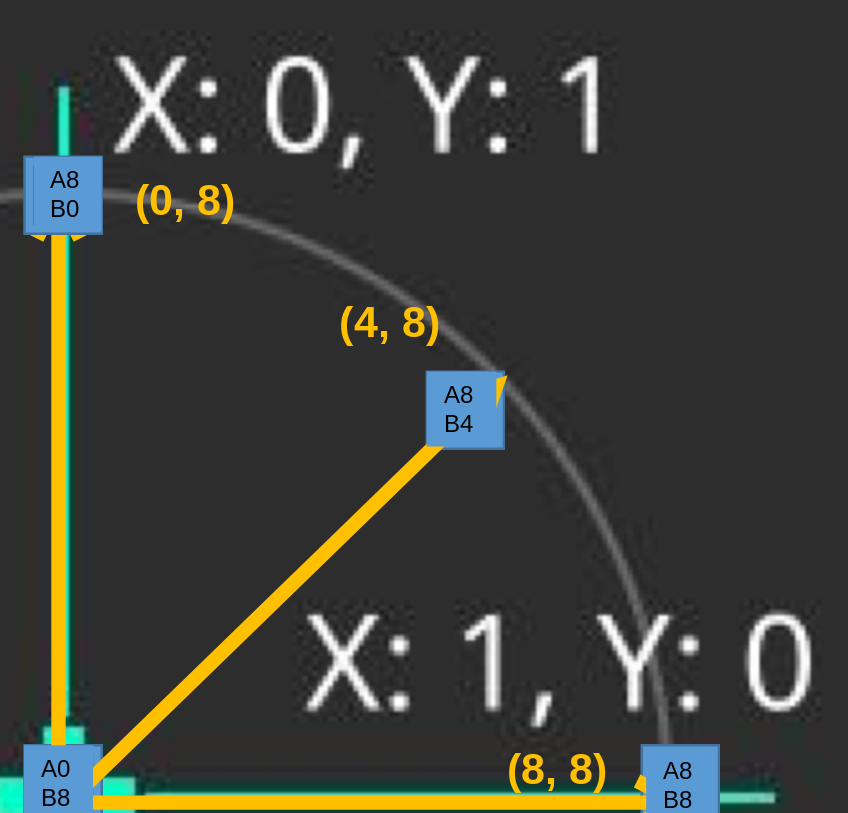
Aha! This is exactly what we need. We need to take the joystick inputs, convert them to polar coordinates, and change the bounds of the coordinate system. Then, we just use the magnitude for the first servo, and the direction for the second!
Why does this work? Well, let’s think back to how the servos interact. One servo pulls in a direction. Then, the other servo also moves in a direction. The second servo will partially or fully cancel out the direction of the “dominant” servo and instead convert that direction into vertical lift.
This clearly maps onto the concepts of magnitude and direction, but reversed. The magnitude is sent to the dominant servo to define how much direction will be provided, and the direction is sent to the non-dominant servo to determine how much “magnitude” (lift) will be provided.
The only remaining question is how to choose the dominant servo. This time, fortunately, the answer is easy. We want to move the tail left or right. While in Cartesian space, we check if the X direction is positive (right) or negative (left). Then we throw away the sign and do our math. At the end, we decide which servo is dominant based on which direction we want to move.
The core algorithm was implemented in about 100 lines of C++ inside the original Crumpet tail app. There was a lot of additional glue code necessary to hack up the beautiful and elegantly designed app to make this work, bringing the total lines of code written to 836.
That code is what you can see running in the video presented at the top of this article! The user inputs a move in a direction and presses the trigger, and the tail moves to that position. The tail always takes the same amount of time to move.
Power and Responsibility
This code is powerful, creating the ability to drive this product far outside its original design. But it magnifies an earlier concern to the point that it can cause damage to the tail to use.
The problem with this code is that it creates many possibilities in which the tail can be left in an “unsafe” state, in which the servos are retracted and powered off. Moving the tail in this state, (for example, by bumping it into something) can easily lead to damage.
The tails original usage, through the app with pre-built movements that always return to home when finished, prevent this potential injury by either having the servos move or being in a home state. The risk for damage was created only when the firmware developer added the “no-home” feature that makes this entire project possible. And entering an unsafe state can be very easy indeed with this program. The user must constantly be entering new inputs to keep the tail moving, or intentionally home it so that damage does not occur. If they absentmindedly move it and forget, it’s easy to bump into something and damage the servos.
I personally made this exact mistake multiple times at the first major outing of this program, even though I was perfectly aware of the concerns being its author. I noticed a visible decrease in motion on a single side after the con was over; six months later, after repeated usage, the beleaguered servo completely gave out and I was forced to replace it.
The point I’m trying to make is that this project is not at all production ready, and you can very easily break your hardware by using it. That’s why I will not be publishing any of the code written here. The Tail Company is run by good people, and I don’t want them besieged by others who used my code, didn’t understand the risks, ended up with broken tails, and thought it was the companys fault and/or the companys responsibility to fix.
Version 3, an engineering failure
I did a lot of experimenting the latter half of 2023, which uncovered some deep-seated problems with the project.
The problem with Version 2 is size and stability. You have to carry around a laptop running the heavily modified tail app (Androids Joy-Con drivers are broken) and if at any point a disconnect happens to either the tail or the controller (which is rather common in a convention space with thousands of people, all with cell phones) you have to open the laptop and manually re-pair the offending device. In addition to being irritating, this is outright dangerous since the tail may get stuck in an unsafe state if disconnected at the wrong time, with no way to send it the homing command to prevent damage to the servos.
I started by trying to build the Crumpet app for the Raspberry Pi Zero W. It should have been clear immediately that if you have to break out Qemu to compile a project because it’s too slow to build on device (see the gacube emeleter for details on that) you probably won’t have much luck running the program. And indeed, after wasting an entire afternoon just compiling, Crumpet ran… at 3 seconds per frame. The beautiful, well-designed Qt app would have to be bypassed.
I took a week to write my own Python-based tail app, which does the same thing as my massive patch, but handles the connection to the Joy-Con and the tail automatically. It can automatically reconnect if a connection is lost to either one.
As it turns out, it also doesn’t work.
There are two cruxes of the problem. The first is that all of the safeguards failed in production, so if something disconnected it simply failed and I had to manually restart it anyway. The second problem seems to be much more insidious— There’s a bug with the Joy-Con firmware that prevents the device from reconnecting to a paired device if the other end uses a Bluetooth V5 adapter.
The internet is rife with reports of this bug. Here’s one thread on Steam documenting it. Apparently, a Bluetooth V4 adapter can be used instead, but none of my devices have one.
Because of this flaw, the Python program has to attempt to re-pair. Apparently, this is much worse for signal reliability than simply connecting to a paired device.
Perhaps it really isn’t that far out of the ordinary to spend an hour at a convention wired in to your Raspberry Pi over Ethernet to figure out why it can’t connect to your Switch controller while your laptop can.
Version 4
When I stumbled upon the bluepad32 library in February 2024, I knew instantly that I had struck gold. Bluepad32 is a fully featured library for that allows one to seamlessly connect pretty much any game controller in existence to multiple popular microcontrollers. One can get out any info any supported controller has to offer, ranging from basic controller input to gyro data. I could keep going on about how awesome it is, how fully featured it is, and how easy it is to use all day… But two things in particular really stuck out at me.
First, being that it runs on bare metal, it’s possible to write patches for the btstack library it depends on. When the author was confronted with a bug report about the aforementioned pairing problem with Switch controllers, he root-caused the bug and wrote a patch for it. This means that, with the patch applied, bluepad32 can pair to Switch controllers. This is honestly incredible work on his behalf.
The second is that it runs on the Raspberry Pi Pico W, a microcontroller I had been teaching myself for unrelated reasons. Being that I was already working with the Pico SDK (which is actually surprisingly buggy), I dropped whatever else I was doing that morning and was able to connect to my Joy-Con within an hour of finding the library.
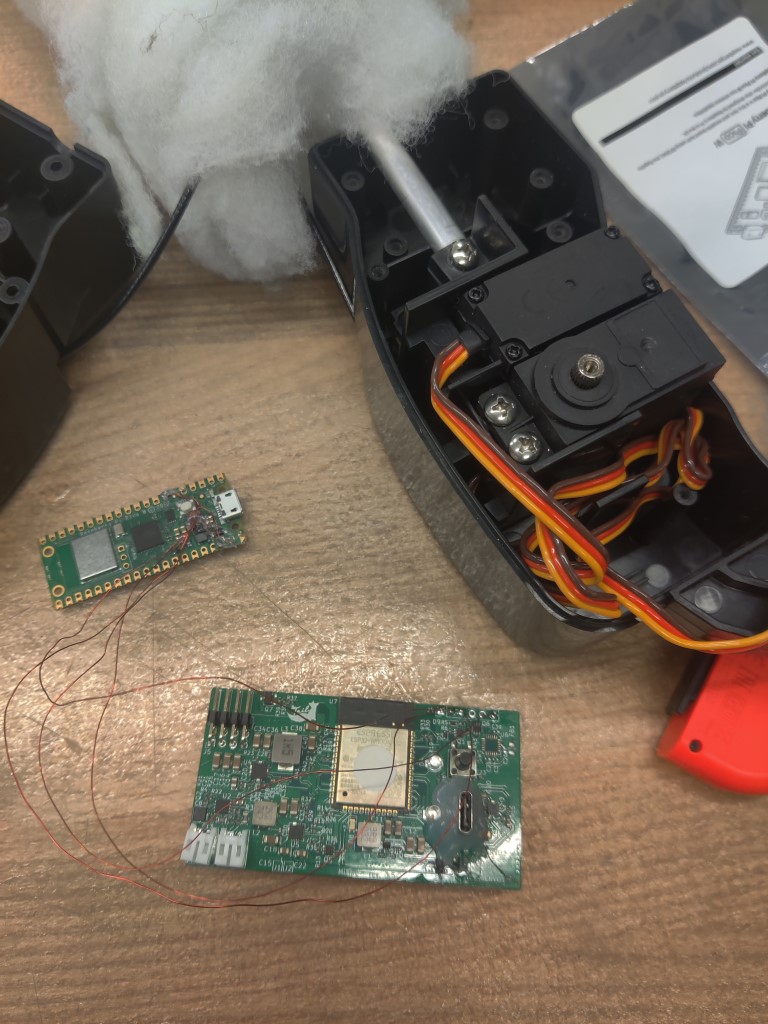
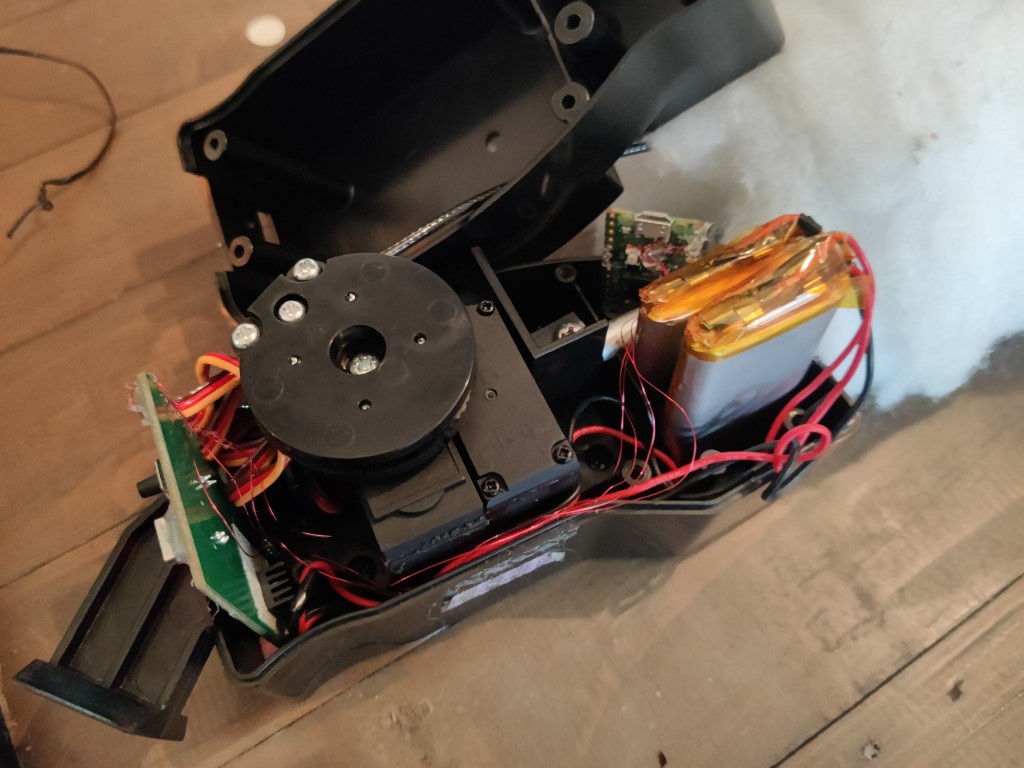
Why does this matter? Well, a few months back, the Tail Co firmware devs had, once again, added a firmware feature at the request of a community member– the ability to send commands over the UART lines exposed at the edge of the motherboard. So if I embedded a Pi Pico W into the tail, soldered it to the motherboard, and adapted my existing tail code, I would finally have an all-in-one, reliable solution, that not only didn’t require any external hardware but also cut out the most unreliable communication, being the Bluetooth connection to the tail.
It took a few weeks of soldering practice to gain some confidence before soldering to my expensive and difficult-to-replace motherboard (oh, and losing my mind discovering a bug in pwndbg that prevented me from debugging the Pico), but I was able to nail down a perfect connection between the Pico W and the tail board.
Of course, I chose to test in production, and it didn’t work at the convention I went to that weekend. I frantically dug out my V2 code on my laptop and drove that, with all the random disconnects it had to offer.
After I got home, I realized I had gotten the TX and RX lines on the UART backward. With a quick swap, everything started working exactly as expected. First try for the software, at least!
Now, I write this segment months after the rest of the original article had been written; putting off wrapping up the last 5% for so long meant that so much time had passed that I conceived of V4, implemented the firmware, did the hardware modification, had it fail at one convention, fixed it, and then successfully took it to a second convention.
It works. All of the problems with lack of reliability and carrying around a laptop are gone. Even in a very crowded convention space with 15,000 attendees I did not experience a single connection problem between the Pico W and the tail. It just worked, a very stark contrast from any of my previous outings with it.
Today and the Future
This is a long-term project for me, and will be improved upon continuously in the years ahead, though the fourth revision removed most of the remaining serious problems with the project.
One issue is that the movement is relatively stilted. The tail takes the same amount of time to go from point A to point B, no matter what the distance actually is— so it takes the same amount of time to swing its maximum distance as it does to make a single subtle movement.
This leads to somewhat stilted movement in practice, though in very recent builds I stopgapped the issue by simply doubling the movement speed and using the second back trigger on the Joy-Con to drive at the original speed. What is necessary is a complex system which can take varying speeds provided by the user and convert them into actual movement based on the tails maximum angular velocity, current position, and desired position.
Another issue is that the Pi Pico is currently suffocating in the tail case. I’m not able to upload new firmware to it without taking apart the housing to get at the debug lines. Fixing this will involve me drilling holes in the casing and then hot-gluing some fly wires to the holes that are connected to the debug lines. Then I can test new Pico firmware at will, which is important because taking apart the tail housing is rather a significant hassle with the way the wires play between the two halves.
It works today, though, and I have a blast using it. Stay tuned for some other unusual furry tech I’ve developed.
Leave a Reply